[columnize]This checklist is a much condensed version of my Photography Guidelines article. If you have photographs ready to send me, I would just encourage you to check them against this list:
Resolution: Can you see individual eyelashes and lines on the lips (when zoomed in)? I am not necessarily going to draw every last hair but I can’t create a likeness if the images are vague. The more detail that’s visible, the better.
Light: Good quality daylight is essential. And – I hate to keep giving you rules but – please don’t send me a portrait in silhouette – honestly, this happens a lot!
Permission If somebody else took the photographs you are sending, please make sure you have their permission for me to recreate them.
Finally: I am not judging your skills as a photographer. Just send me a few images and we’ll take it from there.
Only two weeks away from the shortest day (in the Northern hemisphere), it’s becoming increasingly difficult to draw in the limited winter daylight. Not only has the best of the light gone by 2:30pm but when we do have sun, it is very low in the sky so illumination of the subject and the paper is restricted.
To overcome this there are several options and I have spent the last week comparing four of them. Before I go on, I will just make clear that I’m talking here about quality of light, not about hue. I’ve been sketching with graphite pencil and white paper so the colour of light is irrelevant.
The first and most obvious form of light is natural light – that big blob of fire in the sky. It may be hiding in the other hemisphere for two thirds of the day and then behind clouds for the rest of it, but it is still there and will always be my favourite kind of illumination.
At this time of year, it is possible to see a phenomenon which is visible all the time, but more evident now: If you are indoors observing an object, say a metre from the window, on an overcast day then you will see two shadows. This is because there are two light sources – the sun itself, and then the glow of the cloud cover. If you were outdoors then the glow from the sky (illuminated from behind by the sun) would be all around and so not so obvious. But, when indoors it will be refined as it is only coming from the direction of the window.
In this case I would generally do what I can to cover the sun because its light will fluctuate, not only in strength as the clouds move by, but also in position as it glides across the winter sky. The beauty of illumination from an overcast sky is its diffused nature and in winter the angle of illumination will be fairly low and eerie.
The best hours of sunlight in midwinter are between 10am and 2pm – on a good day! This isn’t very long at all, and if you don’t have the luxury of these hours to yourself, then winter sun isn’t an option.
I would most often draw in this kind of light at home. This is because I draw on the dining table and in this room we have four LED downlights. In general, these lights are great and give good illumination to most of the room whenever required. However, multiple sources of light can be a challenge when drawing. Contrast is drastically reduced. This is a problem because the change in shadow, gives the eye huge clues about the shape of something. The accurate observation of shadow turns a two dimensional object, three dimensional.
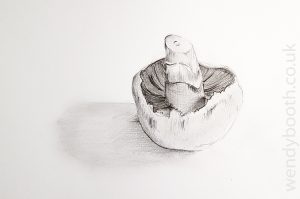
Chilli Powder Line Drawing
Four light sources also means four shadows. Describing [extra href=”#example” title=”Form” info=”popover” info_place=”top” info_trigger=”hover” info_content=”Representation of a three-dimensional object in space” ] form [/extra] with multiple light sources can be problematic. But actually I have found this the inspiration for some interesting projects – both replications of the patterns made by four shadows and also some pleasing line drawings where I have been forced to observe contour by ignoring shade altogether.
It may not be considered the ideal light source, but four downlights are the light conditions I use most in winter, just because it involves the least effort to set up!
[custom_headline type=”left” level=”h2″ looks_like=”h2″ accent=”true”]Reading Lamp[/custom_headline]
A strong source of light, in very close proximity, can offer dramatic lighting effects. There will be very little room for gradual change of depth, even on a rounded surface so I find myself trying to find subtleties that perhaps are not there. Also, I find it hard to distinguish patches of dark cast shadow from [extra href=”#example2″ title=”Form Shadow” info=”popover” info_place=”top” info_trigger=”hover” info_content=”The less defined dark side on an object, hidden from the light source” ] form shadow [/extra]. I can’t use the clues I normally would in my drawings as there is so little graduation. I didn’t have much fun with this type of light.
This lamp is nothing special – just an old bedside lamp. The kind with a shade. Although this is placed as close to the subject as the reading lamp, the effect is much more subtle. Again drama is created, but the [extra href=”#example” title=”Form” info=”popover” info_place=”top” info_trigger=”hover” info_content=”Representation of a three-dimensional object in space.” ] form [/extra] of an object is easier to represent as graduation is a little softer. As we aren’t fussy about colour of light at the moment, I’d say this is on a par with the light from an overcast sky – only far more reliable.
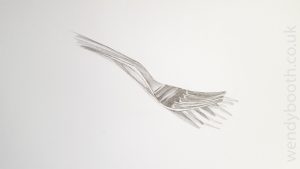
Drawing in Diffused Lamp Light
[line]
For representing [extra href=”#example” title=”Form” info=”popover” info_place=”top” info_trigger=”hover” info_content=”Representation of a three-dimensional object in space” ] form [/extra] the diffused lamp gives a better quality of light than the reading lamp and multiple downlights, but for line drawings and interesting effects I am quite happy with the downlights. However, ideally, I would light my subject naturally with overcast sky. If you cannot escape direct sunlight from your window then an overcast-type effect can be achieved with glassine paper at the window or a plain net curtain.
You are probably here because you are considering sending me some photographs to draw. In which case, I encourage to to read this post and consider the principles set out below when choosing/taking your photos. However, we all lead busy lives and I understand many customers don’t have time to read and digest all the information, so if you are just about to click away from the page, then I’d like to draw your attention to just the two MOST IMPORTANT principles. (On the other hand, if you’d just got yourself a cup of tea and put your feet up, then please continue to the end – you’ll be glad you did!):
[content_band bg_color=”#ffe6cc” border=”all” ] [container] [custom_headline style=”margin: 0;” type=”left” level=”h4″ looks_like=”h3″ accent=”true” class=”my-custom-headline”]Daylight and Focus [/custom_headline]
[icon_list] [icon_list_item type=”sun-o”]Take your photograph outside, out of direct sunlight. Even at midday on a summer’s day it is very hard for a phone camera (or average DSLR lens) to pick up enough light to provide any level of detail whilst indoors.[/icon_list_item] [icon_list_item type=”bullseye”]To gain enough detail for a striking likeness the image must be focussed. Most modern phones make this easy by allowing you simply to touch the area on screen you wish to focus (generally the eye). It is not necessary to create any fancy depth of field or even know what ‘depth of field’ means![/icon_list_item] [/icon_list][/container] [/content_band]
[block_grid type=”two-up”] [block_grid_item] [image src=”http://wendybooth.co.uk/art/wp/wp-content/uploads/2016/03/black-white-photo.jpg” alt=”Backlit photograph for artist commission” type=”thumbnail”][/block_grid_item]
When drawing portraits, there are a few things I need from a photograph that are not necessarily the same things you would want from a portrait photograph. Most modern smartphones are perfectly suitable for photographing portraits and as long as you bear in mind a few simple principles, you will have no problem creating some wonderful images.
Resolution: Most smartphones have great resolution and as long as you take care to focus correctly then it should render enough detail. However, remember that although your phone may take a picture in dim light without flashing, this doesn’t mean it has enough light for a well-rendered picture. Good quality, diffused, daylight is always best (see ‘Light’ section below). To check the level of detail, take a close look at the image. Can you see individual eyelashes and lines on the lips?
Light: I prefer to photograph in natural light – outdoors or close to a window on a bright overcast day. I find this kind of light preferable for all photography and drawing. The diffused nature of the light means the facial features cast soft shadows. Stand the subject so they are facing in the general direction of the light, or up to 45 degrees away, rather than with their back to it.
[/block_grid]
Professional studio photographers will often use diffused flash. This is great if using a single flash placed to the side, or even a single flash and reflector. Too many flashes will remove all shadow, which is great for fashion photography, but not so great for drawing, where some shadow is needed in order to create a three dimensional illusion.
Expression: In my drawings, I like to think I capture a personality rather than a moment in time. So, I encourage you to supply expressions of a pensive nature or a hint of a smile. This also helps with the illusion that the picture was drawn from life.
[block_grid type=”two-up”] [block_grid_item] Permission: If you supply any photographs that you didn’t take yourself then please make sure you have permission of the photographer.
Background: For my pastel portraits, I am drawing the subject’s head. I don’t care what the background looks like!
Finally: I am not judging your skills as a photographer. Just send me a few images and we’ll take it from there. [/block_grid_item] [block_grid_item] [image src=”http://wendybooth.co.uk/art/wp/wp-content/uploads/2016/03/Oscar-Contrast.jpg” alt=”Backlit photograph” type=”thumbnail”] [/block_grid_item]
[/block_grid]